Summary: It is often required to change the OST file path to external hard drive due to storage space issues as the size grows larger. You may also require to save OST to an external drive for backup of the emails and other mailbox items that are stored in the OST file. It helps you restore the OST if it gets corrupt or accidentally deleted. Thus, in this post, we have discussed a few manual methods and an automated method to help you save OST to an external hard drive location.
To save an OST on an external hard drive, you can simply copy the OST file from the default location and paste it on your external drive. While it sounds simple, it won’t benefit at all if later you wish to restore it as OST files are encrypted and require authentication for access. However, you can convert an OST file to PST by using a software such as Stellar Converter for OST when required.
Unlike OST, PST can be imported into any Outlook account to access and restore the mailbox data.
However, if you want to move or save the OST file to an external drive to change the default path location of OST, you can either use ForcePSTPath registry key value or create a symbolic link or junction point. All these methods have been discussed below in detail.
Methods to Save OST to an External Hard Drive
Follow these methods to save OST to an external drive for backup and relocating the OST file on external drive.
Method #1: Export OST from Outlook to External Hard Drive
You can save OST mailbox items to PST format on external hard drive by using the Outlook Import and Export Wizard. This is one of the easiest way to backup Outlook OST emails and other mailbox items. The steps are as follows,
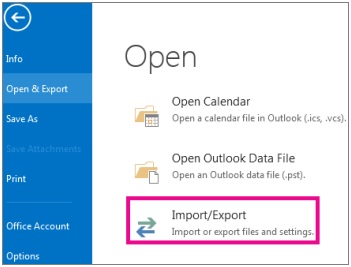
- Open and log in to your MS Outlook and then navigate toFile>Info> Open & Export> Import/Export. This opens the Import and Export Wizard
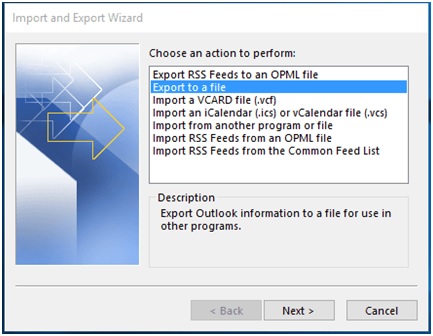
- Select Export to a fileand then click Next
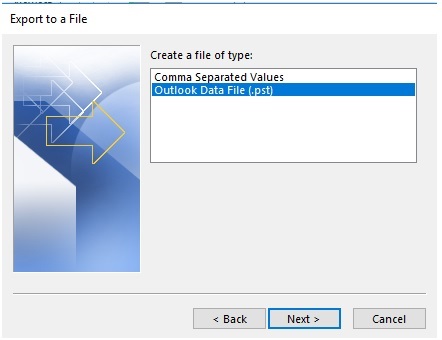
- Then select Outlook Data File (.pst) and click Next
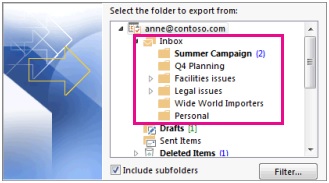
- Select the mailbox folders and mailbox items that you want to save to external hard drive. Also, select ‘Include subfolders’ checkbox. Click Next
- Make sure your external drive is connected to your PC. Then click on the ‘Browse’ button, navigate to save location on the external hard drive. Give the file a name and click ‘Select’
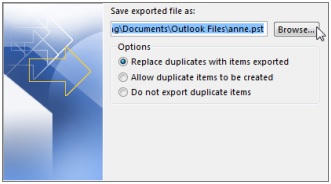
- Once done, click ‘Finish’. When a password prompt appears, click ‘OK’ without entering any password
This will save the OST file to the external hard drive in PST format. In other words, all emails and mailbox items that are stored in your current OST file are saved in the PST file, which you can import to any Outlook account.
You can also open this PST file and access all items in your current Outlook account.
Method #2: Use ForcePSTPath to Save OST on External Hard Drive
ForcePSTPath is a Windows registry key that can be used to set a new location for the OST file. By using this, you can save the OST file to the external hard drive and access it in your Outlook.
The steps are as follows,
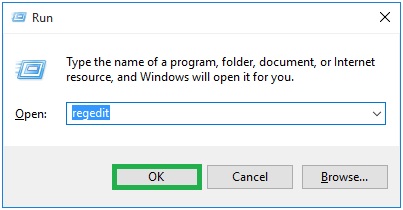
- Press Windows+R, type Regedit, and click OK or press Enter. This opens the Registry Editor window
- Navigate to HKEY_CURRENT_USER\Software\Microsoft\Office\xx.0\Outlook. Change xxx.0 to Outlook version installed on the system. For example, in Outlook 2016 go to, HKEY_CURRENT_USER\Software\Microsoft\Office\16.0\Outlook
- Then right-click on the Outlook registry folder and select New> Expandable String Value option
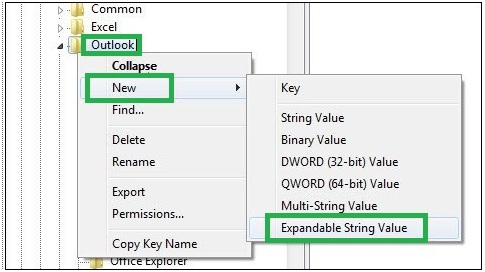
- Type name as ForcePSTPath and press Enter to create the file
- Right-click on this newly created ForcePSTPath and choose Modify
- In the Value name, type ForcePSTPath. In the Value data field, enter your external hard drive volume letter with folder location where you want to save the OST file and click OK
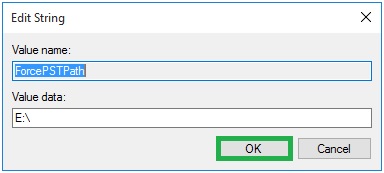
- In the Edit String dialogue box, provide the path location for saving the OST file against the Value Data option. Click on OK
- Close the Registry Editor window and open Outlook. Check if the OST file location is changed or not
If it changes, Outlook will recreate a new OST file to the new location you defined in the ForcePSTPath registry key.
Drawbacks and Limitations of ForcePSTPath
You must execute these steps in the given order and correctly. Otherwise, there’s a risk of data loss due to OST file corruption. The external drive must be connected always and should be disconnected only when you close Outlook to avoid any OST file corruption. Also, you can’t access or relocate an orphaned OST file.
Method #3: Use Symbolic Links to Save OST on External Hard Drive
This is a more advanced method where you repoint the OST file location on external hard drive. This is done on the File System level where you create an NTFS symbolic link to point the OST file stored on another file system by using MKLINK command.
You can also refer this as a shortcut just like Desktop icons. Thus, by using Symbolic Links, you can repoint the OST file location and save the OST on external or network hard drive.
The steps are as follows,
- Move and save the OST file from the original location to the external hard drive. Do not copy. Make sure the original default location is empty.
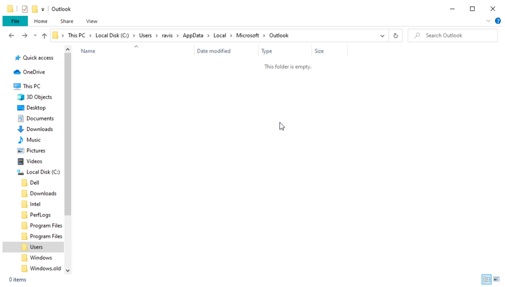
- Open Command prompt as administrator and then execute the following command,
mklink \Users\user\AppData\Local\Microsoft\Outlook\abcd@stellarinfo.com.ost “E:\Outlook Data Files\abcd@stellarinfo.com.ost”
As soon as you execute this command, you will see a message like this,
symbolic link created for C:\Users\ravis\AppData\Local\Microsoft\Outlook\abcd@stellarinfo.com.ost <<===>> D:\Outlook Data Files\abcd@stellarinfo.com.ost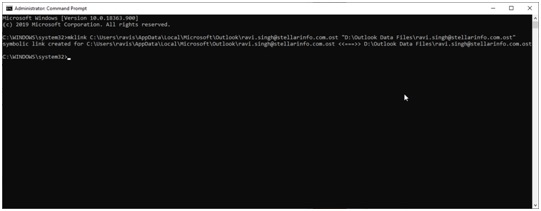
Also, in the default location, you will see a .symlink file for the OST file. In this example, it was abcd@stellarinfo.com.ost.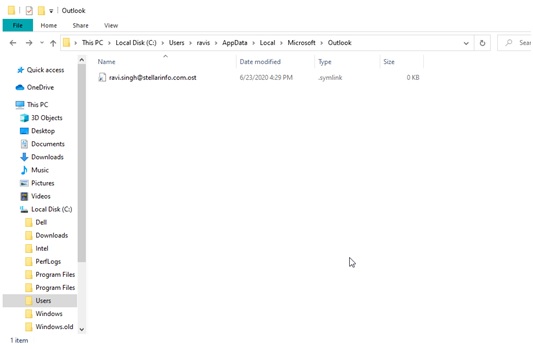
WARNING: Never disconnect the connected external drive otherwise the symbolic link will break that can lead to several errors and OST may become inaccessible.
What If OST Turns Inaccessible?
If you face any issue after relocating or saving the OST file to the external hard drive, you can always use OST to PST converter software such as Stellar Converter for OST. The software will come handy if you mistakenly remove the external drive where OST is stored. In such a case, the OST may enter into the orphaned stage and become inaccessible. Such an orphaned OST file can’t be accessed through Outlook and must be converted to PST by using Stellar Converter for OST software to avoid any data loss.
The software can help you convert orphaned or inaccessible OST files to PST that you can import to your Outlook and restore all mail items. It keeps all attachments, emails, formatting, and other mail items intact.
If you want to avoid any issues, increase the default location storage space by replacing the current drive or save OST mail items to an external drive by converting the OST file to PST.
For more help, leave a comment.
Kamran Sharief
Related posts
Sidebar
Recent Posts
The Rise of Legal Tech Startups: What Law Firms Need to Know
Introduction The legal profession, often rooted in tradition and resistant to change, faces a technological revolution. Legal tech startups are…
Shiba Inu vs. Dogecoin: The Battle of the Meme Coins
In the realm of cryptocurrency, there has been an ongoing battle between two popular meme coins, Shiba Inu and Dogecoin….



Review How to Save OST File to An External Hard Drive?.